Alpha vnc is designed to project the screen of your Android device (end-device) via internet or local network. You can establish a connection from a support-device (e.g. Computer) with a VNC client, such as UltraVNC or TightVNC, which are available in the web for free. For this howto, the UltraVNC Client is used.
Screen elements
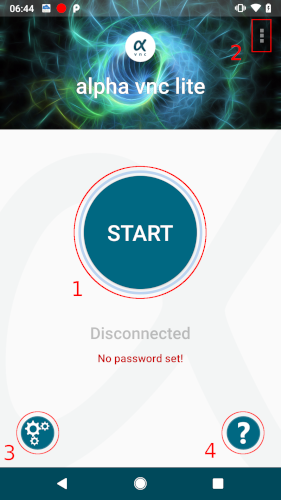
The application main screen consists of the following elements:

1 – Start / Stop the VNC session
2 – Main menu (General Settings)
3 – Session settings
4 – Quick help
Setup & Configuration
Device setup
Following installation, alpha vnc will ask you to configure the end-device appropriately. Once started, the application will check the correct settings and will assist you to complete the configuration, in case that something is missing.
-
-
- Accessibility
-
Alpha vnc can project the screen of the end-device “out-of-the-box” and control it with an input utility, when the Accessibility service is activated. The application will ask you to activate the Accessibility service, once started. You can also activate it manually in the settings of the device. abr-solutions guarantees full privacy compliance. No screen content, inputs or other events are monitored.
-
-
- System overlay
-
Alpha vnc will require the permission to be displayed above all other apps. Whenever a Client is connected, it will show a miniature ‘alpha’ logo on the upper third of the screen. This is a visible indicator that the screen is currently shared and all activities could be monitored. You can also set this permission manually in the settings of the device.
-
-
- Alpha vnc keyboard
-
Prior to Android 7.0 (Nougat), the software keyboard cannot be accessed directly. In order to provide full soft-keyboard support, alpha vnc has a built-in keyboard, which needs to be activated in the input methods of the system settings. If the device is running on Android prior to 7.0, the application will detect it and automatically ask you to activate the built-in keyboard.
Session settings
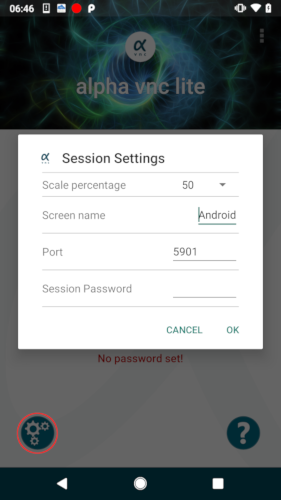
Click the Session settings icon on the left bottom corner of the application main screen, in order to configure the following options:

-
-
- Scale percentage
-
Define the percentage of the display size which will be projected. This way, you can avoid e.g. displaying a large screen in original size, which would lead to a lot of scrolling at the Client side and consume more bandwidth than necessary. Possible values are 25%, 50%, 75% or 100%. The default value is 50%.
-
-
- Screen name
-
Define the name of the end-device, which will be displayed on the Client side.
-
-
- Port
-
Define the local port that the VNC server will be running on. Please, note that the port must be locally available and also open. We recommend using a port between 5901 and 5905. The default value is 5901.
-
-
- Session password
-
Define a password that needs to be entered on the Client side, in order to be able to establish a connection to the end-device. We strongly recommend setting a Session password!
General settings
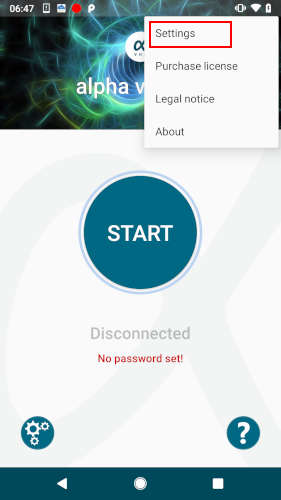
Click the 3-dot icon on the top right corner of the main screen, in order to open the main menu. Select Settings in order to open the general settings of the application. The following options can be configured:

-
-
- Mobile data warning
-
The application displays a warning message, if the VNC server is started while connected to a mobile network. VNC connections can consume a lot of bandwidth, which might cause additional cost on volume based internet contracts. This option is activated by default.
-
-
- Alpha vnc keyboard warning
-
Alpha vnc has a built-in keyboard, in order to provide full soft keyboard support to Android devices prior to version 7.0 (Nougat). The application displays a warning message on devices with Android OS prior to 7.0, if the VNC server is started while using another keyboard. This option is deactivated by default posterior Android 7.0. and activated by default prior to Android 7.0.
-
-
- Start automatically
-
On unencrypted devices, alpha vnc can start automatically on start of the device. This option is supported “out-of-the-box” on all devices prior to Android 10 . This option is deactivated by default.
-
-
- Autostart on mobile internet
-
If this option is deactivated, the VNC server will only start if a wireless or LAN connection is available. When you activate it, the server will start automatically also on a mobile internet connection. Since it may cause additional cost on volume based internet contracts, this option is deactivated by default.
-
-
- Auto wake up
-
The screen of the device will wake up, once a Client is connected. This option is deactivated by default.
-
-
- Unlock screen
-
If this option is activated, the screen can be unlocked, once a Client is connected. This can only work, if no password or pattern is required to unlock the screen. Please, be aware of the potential risk before disabling any security features! This option is deactivated by default.
Connection handling
Start the VNC server
Select the START button on the main screen of alpha vnc, except if you have previously activated the Start automatically option, in which case the VNC server will start automatically on start of the device. An alpha vnc icon will be displayed in the notification area, as an indicator that the VNC server is running.
Connect to the VNC server
When alpha vnc is running, the local IP-address and the port are displayed below the START button. Use this data to establish a connection from the VNC Client: Enter the IP-address followed by the colon (:) and the port into the address field of the VNC client (e.g. 192.168.2.100:5901). Find more information on how to establish a remote connection from a VNC client to the end-device.
Make sure that the port, which the server runs on, is open on the Client side!
When a connection is established, a small alpha vnc icon will appear on the upper center of the display, indicating that a Client is connected to the screen and can observe all activity. The icon will disappear once all Clients have disconnected from the screen. This security feature should prevent you from being monitored without noticing!
Reverse connection
When connecting from a different network – e.g. via mobile internet – a local firewall or private network connection may prevent incoming connections to the VNC server. In this case, you can establish a reverse connection to a listening VNC Client, as follows:
1. Start the VNC Client in listen mode, listening to a port that is forwarded from the router (please refer to the user manual of the VNC Client to learn more).
2. Start alpha vnc.
3. Find the option Add reverse client in the 3-dot context menu on the right top of the main screen. Enter the public IP-address of the router and the forwarded port to the listening VNC Client in the appearing dialog of alpha vnc. The recent 20 successful reverse connections are saved and can be restored by pushing the Show recent button of the dialog.
4. Click on the Connect button to establish the reverse connection.
Make sure that the network setup is correct: The port for the reverse connection must be opened on the router and – if necessary – forwarded to the listening client!
Remote control
Alpha vnc allows to control every Android device posterior 5.0 (Lollipop) remotely.
Posterior Android 7.0 (Nougat), the software keyboard is accessible directly and all systems items are clickable! A pointer device (such as a computer mouse) can be used to point & click. The mouse wheel can be used to scroll up & down. One finger swipe gestures are supported.
Keyboard input – Clickable items – Prior to Android 7.0 (Nougat)
The control of devices prior to Android 7.0 (Nougat) has some minimal limitations (due to the strict Android access control system), as a small price for not having to root the device. Minor issues are reported in combination with 3rd party browsers or apps.
The software keyboard cannot be accessed directly. Alpha vnc provides a standard 104-key US keyboard, which needs to be activated in the input methods of the system settings. If the device is running on Android prior to 7.0, the application will detect it and automatically ask you to activate the built-in keyboard.
System items like the Back, Home or Recent button are not clickable directly. To access those items, alpha vnc provides the following shortcuts:
-
-
- ESC – key: triggers the Back button
-
-
-
- Home / Pos1 key: triggers the Home key
-
-
-
- Page down – key : opens the notification area on top of the screen
-
-
-
- Page up – key : triggers the Recent apps
-
-
-
- End – key: triggers the Power button
-
Copy & paste
You can copy text from your local computer to the remote device. Copy the text as usual from your local computer and paste it into the remote device with the key combination Ctrl+V
Licensing
A license lifts the functional limitations of the application on one end-device. It is acquired via in-App purchase in the Google Play Store and bound to a Google account or other email address. If you don’t have the Google Play services available, please contact our support for further options.
During licensing, an internet connection is necessary on the end-device, for its registration to our management server. In case that a firewall is blocking the connection, the address https://www.abr-solutions.de/* needs to be added in its “white list”.
License (activate) a device
Select the entry Purchase license in the application main menu. The licensing process starts. A pop-up will appear, asking you to select the Google account that will be bound to the license. If you don’t want to use a Google account, you can cancel this dialog and use any valid email address, instead.
In the next step, the Google Play in-App purchase will start. Please, complete the in-App purchase, in order to activate the license.
If you have just released a license from a device, you can reactivate it on the same or another device that is registered with the same email account. In this case, the in-App purchase process will be skipped and your device will be licensed automatically.
Unlicense (deactivate) a device
If you wish to use alpha vnc on another device (e.g. when you have just bought a new handset) or before updating/resetting the OS of the existing device, you need to unregister it from the license beforehand!
In the main menu of the application, choose the entry Unregister device. The license will be “released” and become available to be re-activated.
Follow the usual licensing procedure, via in App-purchase, to reactivate the “released” license. If the device is registered with the same email account, the in-App purchase process will be skipped and it will be licensed automatically without payment requirement.
Please, note that you can unregister a device up to 7 timesfrom a license! After the maximum number of unregistrations is exceeded, you need to contact our support.
Technical support
Our support team will be glad to assist you on all technical questions. Please use our contact form to get in touch!

